skip to main |
skip to sidebar
 Cardboard cut-outs
If your cat(s) are like mine, they like free toys. They seldom flinch with interest when you wave the hot-pink fluffy catch toys you bought. No, they want to burrow in that empty cereal box, hide in grocery bags (gotta watch them), tear the cardboard box for your IKEA furniture, while having a frantic time with a rubberband on the floor!
 Marmaladepets.com cardboard toys template
 "Cut... cut... cut..."
 Final product
The cats are little bit impish today for some reason. Littliest Meeps was even attacking Panya, the bigger cat in the house. Hubby had to step in and held her away from Meeps.
Hmmm... perhaps it's time to "fix" lil' Meeps... ick >_<
Post DIY leanings:
- I dropped the cardboard toys in a bag of catnip and Panya shredded them with her teeth within minutes
- Download the template even it's a circle, it's faster to find the centre point to cut out the slot joint
- Make tonnes with a thicker cardboard box if you have and if your pets like to shred them with their teeth
 In one of my long list of DIY projects to do, one of them is to repaint my IKEA-INGO dining table turned into my study table when we moved.
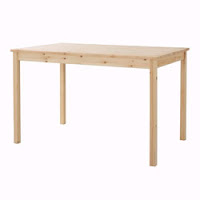
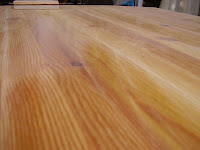
IKEA INGO table
Earlier life the INGO was as a dining table, we found cheap and I love the natural white pine texture, so I have decided to use clear varnish and painstakingly painted it three-times. I even went as far as to drive out in the middle of the night and bought another new paint brush to get the smooth surface. Now, the INGO is my work table since the condominium purchase came with basic furnishing, including a cheesy, bigger, metal-legs-glasstop dining table and chairs. My plan is to paint the INGO in glossy white paint. My research on how to repaint a furniture, lead me to prepare these items:- CRAP brand Glossy white paint, oil-based. Cost: RM 15 (Unfornately, websites from the West recommends latex paint or water-based, semi gloss for best effect, and less odour. I'll have to thin my paint down with thinner. I know, I should use a better brand but this will be my first project and I'm not so sure of my painting skills. Better skills, better paint in future)
- PYE woodfiller. Cost: RM 9.80 (got some dent caused by my mistake of hiring a lousy moving people to move to my new apartment)
- 3" wide foam brush. Cost RM 2.50 (found this in ACE hardware store, this place is like a toy store for me. Website claims this brush will leave the least stroke streaks, we'll see)
- 2" wide normal paint brush. Cost RM 3.50 (for painting the table legs)
- Grade 100, 150 sand paper Cost: RM 1.60 ea
- 6" x 2.5" scrape block for sanding. Cost: FREE (picked up around the refused room)
 Sanded table top
As I trace my fingers along the smooth glossy top of the INGO made me realized I did a good job with the varnishing. I almost couldn't do it, but thought about the new white table to match the room, I bit the bullet and sanded it.
After sanding top, sides and legs, I wiped the table with wet wipes (I'd have used a damped cloth if I got a real garage/workshop with convienient water tap) and old used sponge. Repair the dents with the wood filler, wipe residue with wet wipe and I'm done with sanding.
 Before After
This would make painting of the table easier on 1 & 2 Oct (public holiday here) with the sanding taken cared of today. :) yay! Hopefully, my project will go well. In the afternoon, hubby helped me to prep raw ingredients, I cook a week-long lunches and dinners. Mostly veggies, fritatta, sandwiches. I've started to bring lunches to work to cut back on my own monthly budgeted allowance, so I could save and buy something else for myself.
Really got into it when I bought a RM 15 dual compartment Lock N' Lock bento lunch box. It's seal proof, leak proof, which is important in a bag. I bring them to work, nuke them up at the office pantry. (Of course, I use separate pots dedicated for cooking these office lunches).
These days, I get so tired taking the train from work. Not needing to prep and cook my veggies and meals makes things really easy. That took about 2 hours to prep and cook (and cut part of my finger at that >_< ). After clean up, I began to prepare tonight's dinner. Tonight's dinner is my first try at using the rotating roast thingamajig (hubby says it's called a rotisserie) to roast a whole chicken (minus the neck, feet and tail). Simple Italian herbs, salt & pepper (Sarawak black pepper is best), melted butter and a bit of lemon juice. Two things happened I didn't expect.
 "Don't stick a fork in me, I'm almost done"
- Never thought the cheap Elba toaster-oven-sized oven have a rotisserie, after skewered the chicken and installed them on, it actually turns! Like Kenny Roger's or restaurant's display. Cool!
- The chicken turned out pretty good, perfectly browned and cooked, and juicy. Even the white meat is juicy. This come with repeated basting of the melted butter+herbs mix.
I have learn for future chicken roast, I'll drop a leaf of aluminium foil (size of the bottom of the oven)at the bottom of the grill to catch the anything falling off the hanging chicken. Should cut down the time of cleaning the oven.
Nonetheless, a great way to end a weekend.
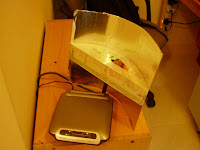
I'm not going to take any credit for this. But just to show that it worked for me and might be helpful for others. M. Erskine is the one who wrote this great article, and gave a great step by step instruction and even a template to work on. For those who want to skip what I have to say, please click HERE to go to Erskine's guide.
A bit of background of our situation. Here in Malaysia, houses and condominiums (known as apartments in other parts) are made out of concrete and bricks. The design of our condominium unit is not perfect. All telephone and internet jacks are allocated pre-construction and there's no way for you to modify/change the location. Basically, no jacks in the room we intended to turn into my husband's home office, we opt to get a Belkin wireless router. Due to the concrete and the angle, this created a "dead zone" for the wifi signal (as my husband call it) in his home office, having the internet die on you is frustrating at times. On a good day, getting 2 bars out of 4 on this wifi signal indicator, while most of the time it would go down to nil or negative (being sarcastic here >_>)
So, I have been researching online for solutions to this problem. Research lead me to find the famous commercial Cantenna, super expensive Belkin Wifi N models, and even DIY cantenna. This website I found seemed to be the most straight-forward and rational solution. If you've watch Mythbuster, you'll know that there's a "Adam's" complex solution, and "Jamie's" simple solution.
Anyway, Erskine's idea is like Jamie's clearcut solution.
I'm not going to go into details of how to do it step by step, but as Erskine mentioned, I love how you can fabricate this with just about anything that could reflect the wifi signal. I opt to use a cereal box, cut into pieces, some aluminium foil, glue stick, foam double-sided tape, scissors and pen-knife, and some masking tape, you're in business. Take some patience to get the parabolic curve to be as accurate as Erskine's template, that's the optimum effective curvature. We didn't use this software to "measure" the signal gain after adding the homemade booster, his received full (4 bars) wifi signal indicator on his Apple is good enough. \o/ ~ hurray and all that. It worked ok.
So there you have it. Great way to end a weekend. =)
Post DIY learning:
- The wifi signal booster really helps where hubby is able to close the door to his home office and still able to get good signal
- The human body obsorbs wifi signal, even with the booster. Basically it's like a great big concrete block so don't stand in front of the direction the booster is facing
 Cardboard cut-outs
 Marmaladepets.com cardboard toys template
 "Cut... cut... cut..."
 Final product


