skip to main |
skip to sidebar
 New cat ledge
Short history, I've built a cat ledge with a board I found in the refuse room, but it had failed and grew unpleasant mold (ick!) that we junked it.
But the cats really enjoyed the ledge, so I decided to spend some money to build a reasonable priced one. It's technically a shelf by the window, that you use cats as the main decoration ;-)
Materials:

FABIAN shelf
IKEA FABIAN shelves: RM 15.90 HALL bracket
IKEA HALL bracketts: 2 x RM 9.90 = RM 19.80
Screws and dowells for the walls and board. Be sure you have a suitable "anchor" if you're installing unto drywall/stud.
1 Liter can of Dulux black Satinwood: Free, my brother is letting me use some after his other DIY project here
(I'm real proud he's managed to refurbish an old office table we gave him. Though it's compacted particle board, it's still usable. I like the glossy finish he did.)
 Painting materials and tools
a random plastic container: free
an unused mug: free
Tools:
Paint Brush: RM 1 (bought from 100% discount store in Kuching)
Electrical power drill and drill bit
Hammer
Screwdriver
Ruler, pencil
 First coating
Firstly, I painted 3 coats of paint on the FABIAN untreated soft pine plank. Pretty straight forward painting, while waiting around 1-half hour for each coating to dry. Confirmed that it's NOT worth it to save a few bucks to skimp on paint brands. First attempt to repaint my dining table with a cheapo white glossy paint didn't work out so well. For months, I still get some paint sticking to my things. I have repainted my table with Nippon Odourless (white) matt paint, and no problems since. It's oil based but dries a lot quicker than glossy paint, even on some of the heavy drip part.
Anyway, because the brackets that comes with the FABIAN shelves are not tough enough to take the impact of the cats jumping from the high shelves in the laundry room, I thought the HALL brackets (made out of cast iron bars) should be sufficient.
The cats didn't like it for the first few months actually because it's painted. Now they don't mind it so much.
Meeps has an appointment this Tuesday to be fixed (or spayed or neutered, whichever is the correct term), and was recommended by the veterinarian to confine her in a pet cage for 10 days. Reasons being to prevent her ripping off her sutures after the surgery. Now, both our cats are indoor cats. That already eliminates Meeps from getting an infection or tear her wound after the surgery. And after the surgery when the anesthesia wears out, she'll most probably be sore from the big cut in her abdomen, hopefully to keep her from being too hyperactive.
But then again, Meeps is a very hyperactive cat. I mean zooming up our row of sofas, then down to hubby's home office, up my old office chair to claw to the top, down the cubby holes of the coat hangers, then off to the sofas and repeat until hubby comes and stop her. This goes on for the entire day (claimed by hubby)until 3-5pm where she will take a cat nap. So, just in case this happens, we'll have a cage already in hand.
 Bedframe crossbars in the background
I got these discarded crossbars from a bedframe to make the cat cage. In fact, two of these bedframe thingies of different wood quality and some unfortunately had grown mold on them. Minus the moldy planks, I have just enough materials to work with.
After taking the plank pieces apart, sawing them in half (from 3 feet long to 1.5 feet), I lay down the pieces on the floor like railway tracks. Partly I'm making this up as I go along, partly I want to see if the cage would be big enough to hold a cat litter box and room for her to roam in. Some of the planks are hard wood, and sawing with a handsaw is not that fun. A circular saw would have cut down the time I took by 80%. I'm expecting to have a sore shoulders+arms+legs for the next few days.
 I sawed a lot of wood that day... -_-;
 Each step as it progressed
Of course, after fabrication, need to test them out. The cage itself weight almost 8Kg. Sufficient to keep her from tipping it over. Next, test subject: Meeps herself. Little Meeps is always curious every time I work on the balcony. So, we let her out and kept her in crate and it seems to hold. There are 1 spot where the gap is slightly too wide. Will need to fix that.
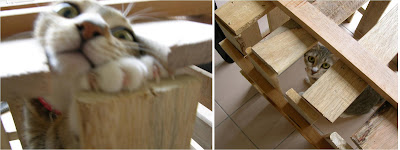 "Lemme out..."
 Panya checking things out as well
Now we need to wait till Wednesday to pick her up after the surgery and keep her there. Fingers crossed and hope everything will go well. End of another weekend.
 Cardboard cut-outs
If your cat(s) are like mine, they like free toys. They seldom flinch with interest when you wave the hot-pink fluffy catch toys you bought. No, they want to burrow in that empty cereal box, hide in grocery bags (gotta watch them), tear the cardboard box for your IKEA furniture, while having a frantic time with a rubberband on the floor!
 Marmaladepets.com cardboard toys template
 "Cut... cut... cut..."
 Final product
The cats are little bit impish today for some reason. Littliest Meeps was even attacking Panya, the bigger cat in the house. Hubby had to step in and held her away from Meeps.
Hmmm... perhaps it's time to "fix" lil' Meeps... ick >_<
Post DIY leanings:
- I dropped the cardboard toys in a bag of catnip and Panya shredded them with her teeth within minutes
- Download the template even it's a circle, it's faster to find the centre point to cut out the slot joint
- Make tonnes with a thicker cardboard box if you have and if your pets like to shred them with their teeth
 New cat ledge

 HALL bracket
 Painting materials and tools
 First coating


 Posts


