Thursday, April 01, 2010

Junk Story: Snille Castor Chair

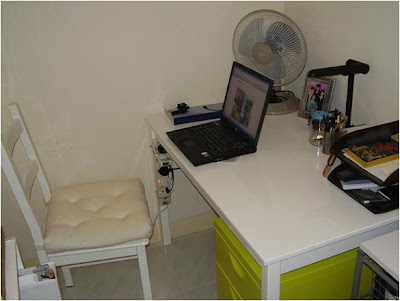
Can't believe people throw away something that only needed a trip to get spare parts

******************************
::Update::
Found another black Snille chair with all the 5 wheels intact, but the plastic seat didn't survive so I took out the plastic "socket" and replace them with my previous broken (that I didn't replace), cleaned up the other wheels and parts for future use, just in case.

::Update Add::
Unfortunately I accidentally plunked down too hard on the chair one night and caused a fracture at the bottom edge of the chair. Will need to be extra careful. The chair is quite functional, better since I replace a proper socket that the wheel doesn't fall off and slide easier.

*******************************

This would be my 2nd best find after the rattan chair. Found it awhile back (ummm... Mar 2009?) at a corner of the building, missing 1 castor wheel. I think the old guards used it to sit while on duty.

The chair itself doesn't cost that much. RM 45.00. But, that was before I knew the cost at IKEA.


New wheel but broken "socket"


It was white, and fit the colour scheme of my corner, the seat is without any crack or signs of wear or tear (minus the broken "socket" & a missing wheel). A mixture of vinegar and dishsoap to clean-up the chair, and purchased a new castor wheel from IKEA customer service for RM 5.00 was needed to fix this "junk" up. Sounds good to me.


Saturday, February 20, 2010

Microwave bracket.... no wait...

Argh!... she used flash to take photos! Eeek!


I made a boo-boo on the measurement, and now the mini oven is on the microwave bracket I bought from IKEA. Oh, well...


Before and After


The small oven (that's actually lighter of the two) ended up being on the bracket

Thursday, February 18, 2010

Supa Glue....

Time to bring out the krazy glue and repair my cellphone from errr... dropping it on the floor a teeny bit too often.

Before After


Not the prettiest, but it works until I get and new cellphone. I lost the broken bits from the phone, so I had to cut-up a plastic pen to glue them into place. At least the gaping hole is not visible. =)

It's been a short but sweet Chinese New Year, I've got a couple of DIY projects waiting for their turn to be completed. God willing I will have some time to work on them these few weekends and holidays.

Saturday, August 29, 2009

Homebaked Blueberry Muffins


I bought a tiny box (1 cup worth) of blueberries from Isetan on Friday, as it was RM 8.90 (RM 1.00 cheaper than usual). A splurge as I haven't baked from fresh blueberries before. They're right when they say one shouldn't go shopping when you're hungry, or you'll end up doing impulse buying.

Now, Coldstorage at KLCC sold muffin pans that I needed, but I didn't have the measurement to make sure it'll fit my small oven or not. So, after bringing Panya back from the vet, we went out to look for a muffin pan, but to no avail. We found an ok baking supply store but they ran out of muffin pans and there was a long line due to a festive season coming.

I ended-up placing a standard sized muffin papercup into my aluminium jelly molds and baked them. They ended up turn out not too bad, fluffy and muffinny. =)

I used N00bcook's recipe which gave credit to the original Jordan Marsh Blueberry muffin recipe that worked quite well for me. Her pointers of use the middle part of muffin tray to be evenly baked is very useful. Becareful not to stir the muffin batter too much so the muffins wouldn't end up too dense. I actually handmixed my muffin batter than using an electric mixer as I halved the recipe. For those who have access to cheap blueberry, you could make a big batch (double or triple the recipe) and keep them in the fridge (fresh muffins in the mornings) or freeze them (ready muffin batter) for future.

Jordan Marsh Blueberry Muffins
Credits: Recipe from ‘True Blueberry’ by Linda Dannenberg
This muffin recipe is that of the famous Jordan Marsh’s
Framingham Store (which closed
down in 1983)

Ingredients:

(Makes 12 standard-size muffins)

2 cups all-purpose flour
2 teaspoons baking powder
1/2 teaspoon salt
110g lightly salted butter (or 1 stick), softened
1 1/2 cups sugar
2 large eggs
1/2 cup milk
2 1/2 cups fresh (or frozen) blueberries

Directions:

  1. Preheat oven to 180C (350F).
  2. Sift the flour, baking powder and salt together into a medium bowl & set aside
  3. In the bowl of an electric mixer, combine butter and 1 1/4 cups sugar and cream at low speed until the mixture is smoothly blended. At low speed, add the eggs, one at a time, and blend
  4. Add the flour mixture and the milk a little at a time, alternating one with the other, and beat until blended, then remove the bowl from the mixer
  5. Add 1/2 cup of blueberries and gently fold them in with a wooden spoon or spatula. Add the rest of the berries and gently fold them in
  6. Place paper muffin cups into the muffin tin, and fill each cup with slightly more than 3/4 of batter. (Note: if not using paper cups, grease the muffin tin)
  7. Sprinkle the remaining 1/4 cup sugar over the muffin tops, then bake in the center of the oven for 25-30 minutes, until the muffins are golden brown and puffy
  8. Remove to a wire rack and cool in the tins for 1 hour before serving
To avoid spending RM 10 to make 12 muffins, I halved the recipe (genius suggestion from hubby) I ended-up with 6 and a half fluffy muffins to enjoy. It's even good enough that I'll give one to Samantha, a small thank-you for getting me nice seasalt and rosemary herbs from Greece. I can't wait to use them in my cooking! ^_^


Monday, August 17, 2009

Junk Story: Snille Castor Chair

Snille Chair

This would be my 2nd best find after the rattan chair. Found it at a corner of the building, missing 1 castor wheel. I think the old guards used it to sit while on duty.

The chair itself doesn't cost that much. RM 45.00. But, that was before I knew it didn't cost that much.

Replaced new wheel purchased at RM5.00 at IKEA


It was white, and fit the colour scheme of my corner, the plastic seat didn't suffer major damages (minus the missing wheel), otherwise, the cats have lots of fun sniffing it that I used a mixture of vinegar and dishsoap to sanitize the chair.

Thursday, August 06, 2009

Junk story: Rattan Chair


Rattan chair on the deck


My best find thus far. Sitting on top of a pile of trash was this almost flawless rattan chair. I know this chair is IKEA (cost around RM69), and only have a small hole on the seat. Not huge gapping hole, but a little tear.
Not too shabby, me thinks

Just right to have it out in the deck. I picked-up a white IKEA seat pad last week. They are kept in a cupboard while not in use since it's not water proof.

Tuesday, June 23, 2009

Homemade Granola Bars


I've wanted to try another recipe after reading MoneySavingMom's granola bars, the original recipe and instruction came with full pictures. I checked I have most of the ingredient the recipe called for and can't wait to rush home after work and try it out.

The difference between granola and granola bars is the syrupy part. In the homemade granola, you don't need to boil the brown sugar, honey, butter and maple syrup if you have them (use less than for bars). You toast the dry and wet mixture together in the oven.

With the homemade granola bars you'll use more syrup, you toast the dry ingredients first, then boil the syrupy mixture then mix, let them cool compacted in a tray, cut them up in sizes you like and that's it.

Lesson learned:
  • Takes more effort to make granola bars, I like them, but hubby likes the crispy granola better.
  • Will boil the syrup mixture longer, maybe 6 minutes instead of 3 minutes to make it more "hard candy" mainly I don't have a candy thermometer and they cost a bomb too. I'll stick to old fashioned self estimated timing.
  • Will make sure that I have bulk ingredients next time, and trying with chocolate chips, almond, etc.
  • Will certainly make some for our long-haul flight to the US for hubby as flight food isn't that great after you been groggy and flabby for 20 hours


Tuesday, June 16, 2009

Homemade Granola

My failed attempt of baking granola bars with this recipe I found last month, it turned out too soggy and a slight eggy-smell that I don't enjoy too much and too embarrassed to let anyone try.

Unfazed, I have decided not to use any recipe that calls for a wet mixture. A "homemade granola" goggling lead me to several prominent recipes that I intend to try, omitting quite a few of the ingredients that that is too expensive to splurge on.

From joyofbaking - straight forward recipe with lots of background and tips that is somewhat useful and what to expect from toasting your own granola.

I used the kitchensinkrecipes for my homemade granola, check out her website if you're more interested on the full recipe. Below my recipehack, ingredients I used in red
.

Granola

3 1/2 cups rolled oats
1/2 cup coconut flakes, unsweeteend
3 tablespoons flax seeds
3 tablespoons sesame seeds
1/4 cup sunflower
1/4 cup pumpkin seeds
1/2 cup toasted mixed nuts, chopped (I used pistachios and almonds here) <== I'm planing to put in raw almonds next time
2 teaspoons cinnamon
1 teaspoon sea salt

1/4 cup brown sugar
1/4 cup canola oil <== I used 2 tablespoon of melted butter 2 tablespoons honey 1 tablespoon pure maple syrup
2 teaspoons pure vanilla extract
2 cups mixed dried fruit (I used raisins and dried cherries and cranberries here)

Lesson learned: does not reuse a baking sheet after the first batch, it catches fire easily as it is "crispy". Otherwise, my granola tastes caramel-ly, a better attempt than the 1st.

Hubby and my friend seemed to enjoy snacking on it. I'll be making more as gifts to friends, and also my breakfast~

Saturday, June 13, 2009

It's the weekends!

Slow day for the kitties

Grocery shopping took longer than I thought today, and I always seemed to choose the wrong line, regardless how little the line took this morning when I was checking-out.

In absence of hubby's company early this morning, I have decided to take my colleague's advise to try out the UK-Tesco store-brand items, I bought their chocolate cookies and strawberry jam. Not sure how they will turn out. I've got my milk ready tomorrow morning... MMM... cookies for breakfast!

List of projects to catch-up on (in no particular order):
  • IKEA bag bottom insert
  • Put away the rest of my homeless objects
  • Make toasted oats bar
  • Plant wheatgrass
  • Plant my greens (local spinach & jiu choi)
  • Iron clothes (just got a new ironing board, bought an unstable one)
  • Wash car, maybe wax the car
  • Clean all windows (inside & maybe the outside), and sliding door
  • A shelf above the kitchen trolley with hooks for the cups
  • Bring Dopey to vet, get a cat collar for him
But first, dinner. Can't wait for Sunday.

Monday, June 08, 2009

Late "Spring" Cure 2009

Before: Entire layout

After: Entire Layout

Before: Close-up

After: Close-up


A term used by Apartment Therapy to motivate readers to clean-up and organize their messy spot and post the before and after result on Flickr.

Mine happened late spring and living in a country sitting right on the equator, honestly there's no spring, it's always humid summer.

I did my "Spring" cure last weekend, a long weekend (w00t~! \o/) and finished many projects that was piling since March 09.

I've been looking out for unwanted planks to no avail. I opted to get the soft pine planks from FABIAN, and the wooden brackets (forgotten the name and price, but it's not that expensive), and I've painted them white (Nippon Soft Matt for wood & metal).

I have to admit, I am an IKEA fan, and my corner does look like an IKEA catalogue. I didn't have time to edit the photos with IKEA names & prices on them with IKEA fonts. =)

Thursday, January 01, 2009

Junk story: Whiteboard

Whiteboard found it's way at my corner

The whiteboard was at the refuse room, quick inspection was that it wasn't in a bad state, and a little cleaning-up, it's still decent enough to use it. After long consideration (this was picked-up, maybe last year in May?), I got my brother to get it for me, for I was too shy to go pick it up myself.

I have added cork boards (the rectangle cork trivets from IKEA) next to the whiteboard for the lovely cards I get from time to time, also useful coupons that would crowd the whiteboard too much if you're not careful. Those things tend to invade a magnetic board rampantly. Oh, I love staples guns. Should have gotten one earlier. It's so useful for many small projects I've worked on.

These days, I still look out for worthy pieces and add them to my pile of "treasures" on the deck. From time to time, I get inspired what to do with them. Sometimes, I know what to do with it, just needing an extra paint job or anything that required me to wait till my free-weekend.

I've recently got back into my DIY groove again, mainly by switching our grocery shopping to biweekly. I'll try to plan to get any other pet supplies, DIY materials, etc during the week I'm doing my grocery shopping. Having a free weekend at home does help, though sometimes there are things that suddenly pop-up. Nontheless, the new schedule allows me to have more time to do most of my major projects. Long weekends are definitely a huge plus.


I've also started doing minor projects after dinner during weekdays. Mainly, hubby has been working longer hours, and I take that time to work on smaller projects that doesn't require power tools, but when he's free and not working, I definitely
choose hanging out with him over the projects, cause that's what a home is. =)

Wednesday, December 31, 2008

Junk Story: Shoe racks

I still have more shoes than my hubby... sigh...

This is going to be a series of junk making it into my home as a new repurposed function/furniture that is anesthetic enough to not look too shabby.


These shoe racks here is actually made out of 2 separate pieces I picked-up at the refuse room. The first rack (bottom half) doesn't even have any flaws on, it's lacquered, clean, have all the legs/supports but just sitting out in the refuse room.


The 2nd piece was however less of a good find. A 3-tier shoe rack, missing one of its support part, a little bit dirty and no varnish on.

But with a little modification, I have modified it into a 2-tier rack that serves its function, adding on top of my previous double-story shoe rack to make it 4. 2+2=4

Refurbish Cat Ledge Project

New cat ledge

It's been awhile since I posted (since October 2008?!) and I think I will start pick things up again. I'll try to keep my post short and sweet.

Short history, I've built a cat ledge with a board I found in the refuse room, but it had failed and grew unpleasant mold (ick!) that we junked it.

But the cats really enjoyed the ledge, so I decided to spend some money to build a reasonable priced one. It's technically a shelf by the window, that you use cats as the main decoration ;-)

Materials:


FABIAN shelf

IKEA FABIAN shelves: RM 15.90

HALL bracket

IKEA HALL bracketts: 2 x RM 9.90 = RM 19.80


Screws and dowells for the walls and board. Be sure you have a suitable "anchor" if you're installing unto drywall/stud.

1 Liter can of Dulux black Satinwood: Free, my brother is letting me use some after his other DIY project here

(I'm real proud he's managed to refurbish an old office table we gave him. Though it's compacted particle board, it's still usable. I like the glossy finish he did.)

Painting materials and tools

2 Liter King Cobra thinner: RM 20 (leftover from my many oil-based paint projects
a random plastic container: free
an unused mug: free

Tools:
Paint Brush: RM 1 (bought from 100% discount store in Kuching)
Electrical power drill and drill bit
Hammer
Screwdriver
Ruler, pencil

First coating

Firstly, I painted 3 coats of paint on the FABIAN untreated soft pine plank. Pretty straight forward painting, while waiting around 1-half hour for each coating to dry. Confirmed that it's NOT worth it to save a few bucks to skimp on paint brands. First attempt to repaint my dining table with a cheapo white glossy paint didn't work out so well. For months, I still get some paint sticking to my things. I have repainted my table with Nippon Odourless (white) matt paint, and no problems since. It's oil based but dries a lot quicker than glossy paint, even on some of the heavy drip part.

Anyway, because the brackets that comes with the FABIAN shelves are not tough enough to take the impact of the cats jumping from the high shelves in the laundry room, I thought the HALL brackets (made out of cast iron bars) should be sufficient.

The cats didn't like it for the first few months actually because it's painted. Now they don't mind it so much.

Sunday, October 12, 2008

DIY: Wood Pet Enclosure


Meeps has an appointment this Tuesday to be fixed (or spayed or neutered, whichever is the correct term), and was recommended by the veterinarian to confine her in a pet cage for 10 days. Reasons being to prevent her ripping off her sutures after the surgery. Now, both our cats are indoor cats. That already eliminates Meeps from getting an infection or tear her wound after the surgery. And after the surgery when the anesthesia wears out, she'll most probably be sore from the big cut in her abdomen, hopefully to keep her from being too hyperactive.

But then again, Meeps is a very hyperactive cat. I mean zooming up our row of sofas, then down to hubby's home office, up my old office chair to claw to the top, down the cubby holes of the coat hangers, then off to the sofas and repeat until hubby comes and stop her. This goes on for the entire day (claimed by hubby)until 3-5pm where she will take a cat nap. So, just in case this happens, we'll have a cage already in hand.

Bedframe crossbars in the background

I got these discarded crossbars from a bedframe to make the cat cage. In fact, two of these bedframe thingies of different wood quality and some unfortunately had grown mold on them. Minus the moldy planks, I have just enough materials to work with.

After taking the plank pieces apart, sawing them in half (from 3 feet long to 1.5 feet), I lay down the pieces on the floor like railway tracks. Partly I'm making this up as I go along, partly I want to see if the cage would be big enough to hold a cat litter box and room for her to roam in. Some of the planks are hard wood, and sawing with a handsaw is not that fun. A circular saw would have cut down the time I took by 80%. I'm expecting to have a sore shoulders+arms+legs for the next few days.

I sawed a lot of wood that day... -_-;

Next I cut up the thin wooden bar by half, that gives me the crossbars to hold the vertical planks as shown. Nailing seems to be a pain on the hard wood. Looked almost like a dwarf's picket fence if you ask me.

Each step as it progressed

The cage is not great, but good enough for its possible function to serve for 10 days. I could have marked, measured, drilling to precision, but I didn't. My initial plan was to have a swing door with two latches (top and bottom) to lock her in. In the end, since the cage is bottemless, we figure we'll just lift the cage up, while the other grab the cat litter box to clean out should be sufficient. Thus, we nailed the last side of the crate.

Of course, after fabrication, need to test them out. The cage itself weight almost 8Kg. Sufficient to keep her from tipping it over. Next, test subject: Meeps herself. Little Meeps is always curious every time I work on the balcony. So, we let her out and kept her in crate and it seems to hold. There are 1 spot where the gap is slightly too wide. Will need to fix that.

"Lemme out..."

Otherwise, it's good enough to keep her in, with enough space to lie down and rest. It is afterall, an enclosure to recovery, not a playpen.

Panya checking things out as well

Now we need to wait till Wednesday to pick her up after the surgery and keep her there. Fingers crossed and hope everything will go well. End of another weekend.


Sunday, October 05, 2008

Mini DIYs


Egg in the Hole

It has been an alright weekend this time. Saturday, always a lot more fun because you got Sunday to follow-up with. But Sunday, always the pre-Monday Blues day, less fun. Anyway, Saturday morning, I got inspired to cook Rose's (mother-in-law) Egg in the Hole for breakfast after reading this post last Friday. Baked banana cake with Rose's sugar frosting in the afternoon with hubby always look forward to lick the leftover frostings. Also, had home-made burger and tatoes chips (microwaved chips!) for dinner. =) I love Saturdays!

With the feel good rant done, on with my DIY post. Now that my completed my major painting project (still breathing in "lovely" paint fumes -_-), and short of materials to continue my long list of home projects to do, as suggested on the title, this will be a short post about quick projects I've done.

First up, change jar. I have tonnes of jars at home. Jars as in glass jars. Plastic we reuse them to keep our kaya after opening from their cans. I gotten the idea to rid these jars of their ugly labels so could reuse them for other things. Being glass, they are prettier than plastic jars.

To rid of the labels, I soaked them in a big pot of hot water for about 30 minutes. Later, scrapped the wet labels off with hand. Leaving the stubborn glue that now can be scrubbed off with dishsoap and scrubber.

This blog has given me an idea to make my own change jar on my desk. I used to have change metal tins and piggy bank that looked stupid and I always ended up using all the change fed up it never gets full. Now, with a clear glass jar, hopefully I'll save some money every month.
Change jar

I admit, it's shoddy work, cuz I was too lazy to go back and get the proper tools to work on.
My raggety teeth chew on your coins

Another small DIY I did was made my own cladded hand sander that was used to sand my table before repainting white. Instead of just using a block of scrap wood, I just cut 2 pieces of 6" x 2" x 0.5" scrap wood, drilled holes on them to get the sides of the sand paper to be cladded together. That way the sand paper doesn't slide when too engrossed sanding.

Sander

Next time I'll spray paint the change jar top silver, and maybe improvise the sander to be able to hold a different graded sand paper on the otherside of the block.

That's a project for another day.

Friday, October 03, 2008

Trick O' Peeps! ^_^

Peeps!

Ok, a non-DIY related post here. This was a totally an impulsive buy at the Cold Storage check out counter. My eyes were drifting along the aisles of mints trap and saw Peeps. Pumpkin and ghost Peeps for the upcoming Halloween. It's obviously catering for the American expat living in KL, not that they'll let their kids roam house to house calling "Trick or Treat" and start throwing toilet paper rolls at houses. Anyway, I double checked that it cost RM 3.99 each box.

Ghost Peeps

For those who are unfamiliar, PEEPS are basically coloured marshmallows lightly coated in fine sugar, specialty mass produced candy for special holiday seasons in America like Easter (that's when it got really famous with its bird marshmallows), Christmas, Halloween and even Valentine's Day.

The original Easter Peeps

I remembered my mother-in-law was so cool she FedEx'd (9000 miles across the Pacific Ocean!) these lovely yellow Peeps and Cadbury Creme Eggs. They were so good. Unfortunately, Cadbury Creme Eggs are so elusive we only found them in Singapore's Cold Storage.

Look almost like 3 quarter cooked egg

Can't understand why those have a hard time getting here. Not that they couldn't have a whole section labeled "Non Halal" if any of the ingredients are of any concerns.

Double Pumpkins Peeps

The Pumpkin Peeps has 130 cal, and Ghost Peeps has 110 cal. Cool treat for a Friday homemade pizza night.

Thursday, October 02, 2008

Repainting Table-White


Finished product and all set-up


I was going to name the title in "How NOT to repaint your furniture" by giving a bunch of NOT TO DO tips. But I think the title would end up too long. I'll list my instructions, and maybe someone could point out what I did wrong (besides hundreds of mistakes I've learned already)


  1. Prepping the furniture before painting it is a must. Sand all the surface until you cannot see the previous shining paint. I didn't sand the chair and that took longer to I ended up painting more coats cuz the paint won't stick/spread as evenly
  2. Obviously, wipe the furniture off with a damp cloth a few times. Don't have to be too obsessive with it cuz you'll do 2 or 3 coatings of paint
  3. Crack open that new can of 1 litre paint (I bought "Goldlux" white glossy oil-based paint cuz I can't find latex paint), have your 2 liter of thinner ready and pour about a dash of thinner into the paint for the first coat. I should probably prime it with a primer
  4. Dip the paint brush half way, brush slightly at the can opening to make sure it doesn't drip.
  5. Angle the brush almost at a 45 degree, apply pressure slightly before drag and apply more pressure, following the grains of the furniture. By this time, the paint would have thin and I would "steal" paint from the begining where I first apply the 1st stroke and run the paint a few times until it's evenly distrubuted. Many people say this is the wrong way of doing this, but I just can't help it that my skill sucks so much and the paint application is so uneven
  6. Repeat correct painting strokes until you finish 2 or 3 coats
  7. I turned the table upside down to paint the insides first or else you'll get a really sore shoulders if you want to paint looking up
Before After


I actually repainted a table, a dinky IKEA wooden chair, and a flimsy shelves (from my college years, surprised it's still standing honestly) to match with my office corner here. Now I need to get a pair of nice small white speakers, DIY myself a shallow white hutch on the desk and we're set. Oh and a 3' x 1' footstool for ergonomics set for my vertically challenged self.

I made a lot of mistakes, mainly due to my lack of any painting skills (Mr. Miyagi's advice didn't help), partly I should have started with practicing painting smaller objects, as well as not skimp on higher quality paint. Buy branded paint, preferably odourless, all of us agree that in an apartment with no ventilation (except when mommy's home), it's for best.

This "Goldlux" paint is very glossy and even when I left the table out on the balcony for almost 24 hours, the paint hasn't really dried. I gave up at 6pm today cuz I'm going back to work tomorrow (yay it's Friday, w00t!).

In future, I'm toying with the idea of getting non glossy paint (not to mention my apartment smells like kerosene) at all. Maybe get a semi gloss/sateen paint meant for interior homes, at least they're water based and you can wash them off with water.

Anyway, it was the drying that took so long, that I had to wait and wait and wait for each layer to dry. I did 3 layers on the table top, 2 layers of the shelves, and 3 layers on the chair too, I don't remember. Finished using the whole can of 1 liter white paint at least. Gotta find a bigger cardboard box for laying out the whole balcony.

Paint still waiting to dry with the feeble morning sun, and yes, I forgot to paint a strip on the bookrack

Do not use newspaper cuz they will stick to your freshly dripping painted furniture and stick to it. Start hording clean large pieces of cardboards. Plus, I was probably too rushed to get the whole thing painted quick after each layer before they're done. Should have taken Friday off so the painting can spread out but will make the whole project a drag. I still got those annoying kamikaze bugs that like to stick to mildly dried paint. I'm just glad to have my table back and have my things put back to their places again

Running out of space

Oh, and an electrical sander would probably helped if you don't have a long weekend to prep and paint and wait for the paint to dry and paint, and wait and paint. I hand-sanded the table and it was alright, probably should get finer sandpaper next time (200-300).

I just found a website that would have been useful thing before I bought the paint. A commenter mentioned it usually takes 24-48 hours for ONE coat of oil-based paint to dry. So, if you need the furniture like post-haste, be sure to use latex (if we have that over here) or I'll experiment with interior wall paints. -_-

Before After

Monday, September 29, 2008

DIY: Cardboard Cat Toy

Cardboard cut-outs

If your cat(s) are like mine, they like free toys. They seldom flinch with interest when you wave the hot-pink fluffy catch toys you bought. No, they want to burrow in that empty cereal box, hide in grocery bags (gotta watch them), tear the cardboard box for your IKEA furniture, while having a frantic time with a rubberband on the floor!

Marmaladepets.com cardboard toys template

Moderncat site featured DIY cardboard toys for kitties. You can download three templates for cat toys for free here.

"Cut... cut... cut..."

Instructions are pretty straight forward. Download template, glue template to whatever cardboard you got lying around, cut and assemble. I'm lazy tonight so I'm making the cardboard ball for them to play with. No need to print anything out.

Final product

Got a thin cardboard box, which was too flimsy for rough play. Glued 2 layers together solved the problem.

The cats are little bit impish today for some reason. Littliest Meeps was even attacking Panya, the bigger cat in the house. Hubby had to step in and held her away from Meeps.

Hmmm... perhaps it's time to "fix" lil' Meeps... ick >_<

Post DIY leanings:
  • I dropped the cardboard toys in a bag of catnip and Panya shredded them with her teeth within minutes
  • Download the template even it's a circle, it's faster to find the centre point to cut out the slot joint
  • Make tonnes with a thicker cardboard box if you have and if your pets like to shred them with their teeth

Sunday, September 28, 2008

Sand the table

In one of my long list of DIY projects to do, one of them is to repaint my IKEA-INGO dining table turned into my study table when we moved.
IKEA INGO table

Earlier life the INGO was as a dining table, we found cheap and I love the natural white pine texture, so I have decided to use clear varnish and painstakingly painted it three-times. I even went as far as to drive out in the middle of the night and bought another new paint brush to get the smooth surface.
Now, the INGO is my work table since the condominium purchase came with basic furnishing, including a cheesy, bigger, metal-legs-glasstop dining table and chairs. My plan is to paint the INGO in glossy white paint. My research on how to repaint a furniture, lead me to prepare these items:
  1. CRAP brand Glossy white paint, oil-based. Cost: RM 15 (Unfornately, websites from the West recommends latex paint or water-based, semi gloss for best effect, and less odour. I'll have to thin my paint down with thinner. I know, I should use a better brand but this will be my first project and I'm not so sure of my painting skills. Better skills, better paint in future)
  2. PYE woodfiller. Cost: RM 9.80 (got some dent caused by my mistake of hiring a lousy moving people to move to my new apartment)
  3. 3" wide foam brush. Cost RM 2.50 (found this in ACE hardware store, this place is like a toy store for me. Website claims this brush will leave the least stroke streaks, we'll see)
  4. 2" wide normal paint brush. Cost RM 3.50 (for painting the table legs)
  5. Grade 100, 150 sand paper Cost: RM 1.60 ea
  6. 6" x 2.5" scrape block for sanding. Cost: FREE (picked up around the refused room)
Sanded table top

As I trace my fingers along the smooth glossy top of the INGO made me realized I did a good job with the varnishing. I almost couldn't do it, but thought about the new white table to match the room, I bit the bullet and sanded it.


After sanding top, sides and legs, I wiped the table with wet wipes (I'd have used a damped cloth if I got a real garage/workshop with convienient water tap) and old used sponge. Repair the dents with the wood filler, wipe residue with wet wipe and I'm done with sanding.
Before After

This would make painting of the table easier on 1 & 2 Oct (public holiday here) with the sanding taken cared of today. :) yay! Hopefully, my project will go well.
In the afternoon, hubby helped me to prep raw ingredients, I cook a week-long lunches and dinners. Mostly veggies, fritatta, sandwiches. I've started to bring lunches to work to cut back on my own monthly budgeted allowance, so I could save and buy something else for myself.

Really got into it when I bought a RM 15 dual compartment Lock N' Lock bento lunch box. It's seal proof, leak proof, which is important in a bag. I bring them to work, nuke them up at the office pantry. (Of course, I use separate pots dedicated for cooking these office lunches).


These days, I get so tired taking the train from work. Not needing to prep and cook my veggies and meals makes things really easy. That took about 2 hours to prep and cook (and cut part of my finger at that >_< ). After clean up, I began to prepare tonight's dinner. Tonight's dinner is my first try at using the rotating roast thingamajig (hubby says it's called a
rotisserie) to roast a whole chicken (minus the neck, feet and tail). Simple Italian herbs, salt & pepper (Sarawak black pepper is best), melted butter and a bit of lemon juice. Two things happened I didn't expect.

"Don't stick a fork in me, I'm almost done"
  1. Never thought the cheap Elba toaster-oven-sized oven have a rotisserie, after skewered the chicken and installed them on, it actually turns! Like Kenny Roger's or restaurant's display. Cool!
  2. The chicken turned out pretty good, perfectly browned and cooked, and juicy. Even the white meat is juicy. This come with repeated basting of the melted butter+herbs mix.
I have learn for future chicken roast, I'll drop a leaf of aluminium foil (size of the bottom of the oven)at the bottom of the grill to catch the anything falling off the hanging chicken. Should cut down the time of cleaning the oven.

Nonetheless, a great way to end a weekend.